What is Semantic Segmentation?
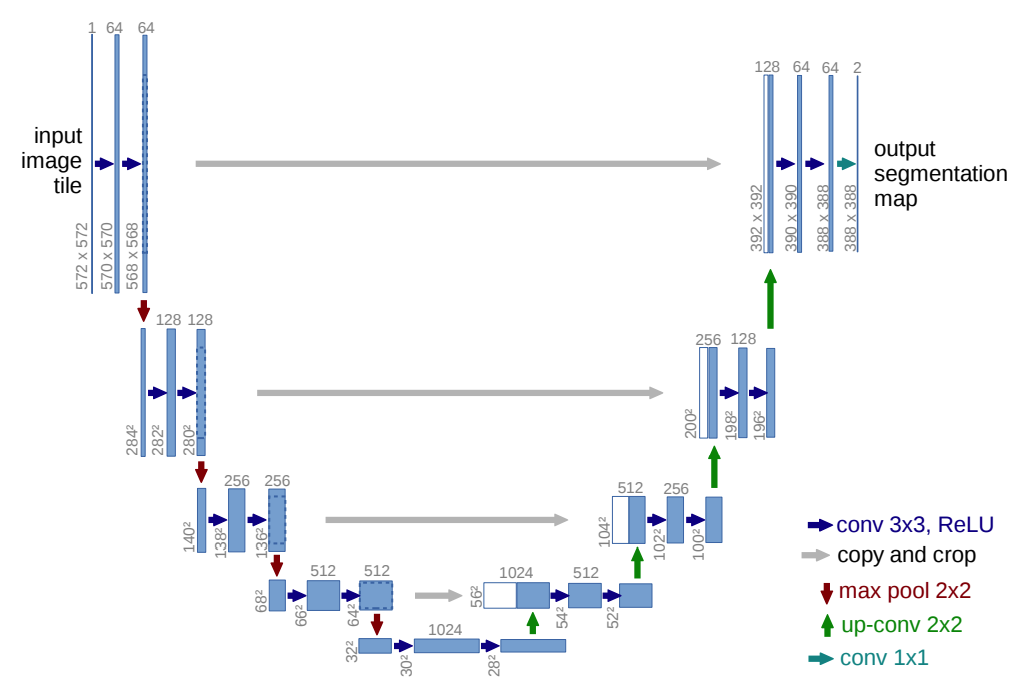
Semantic Segmentation, also called image segmentation or pixel-based classification, is a technique in which each pixel in an image is classified as belonging to a particular class. Deep learning methods have been very successful at image segmentation and U-Net is one of the most well-recognnized image segmentation algorithms. U-Net was originally designed for use in biomedical image segmentation and was used to win the cell tracking challenge at ISBI 2015. The architecture consists of a contracting path to capture context and then a symmetric expanding path to enable localization, giving it a U-shape when drawn:
 From U-Net: Convolutional Networks for Biomedical
Image Segmentation.
The main idea in this architecture is to combine features from the contracting path with the upsampled output from the expanding path. According to the authors the architecture works well even with very few images.
In addidtion to U-Nets success in biomedical imaging, it has been successfully used to detect defects in roads and it also formed the basis of many top-ranked solutions for the Carvana Image Masking Challenge, see here and here.
U-Net Implented in Tensorflow 2.0
One of the strange things about the U-Net architecture as described in the original paper is the use of cropping.
 If you look closely you can see the faint dark blue outlines inside the blue box on the right.
I haven’t really seen this method used in any other convolution neural network (CNN) architecture and the authors don’t provide any reason for cropping convolution outputs. I tried both the cropping method as oulined in the paper and a modified non-cropping U-Net on the Carvana data set, and found no difference in performance. The non-cropping version is more versatile as it can be applied to any image size without needing to worry about the size of cropping dimensions and that is why I ended up using it for all of my tests.
Here is the non-cropped implementation of U-Net CNN in Tensorflow 2.0.
from tensorflow.keras.models import *
from tensorflow.keras.layers import *
from tensorflow.keras.optimizers import *


def unet(input_img):
    # padding = 0 , stride = 1
    # input image = 576*576
    c1 = Conv2D(filters=64, kernel_size=(3,3), activation='relu', padding='same')(input_img) #576*576
    c2 = Conv2D(filters=64, kernel_size=(3,3), activation='relu', padding='same')(c1) # 576*576
    mp1 = MaxPool2D(pool_size=(2,2))(c2) # 288*288
    c3 = Conv2D(filters=128, kernel_size=(3,3), activation='relu', padding='same')(mp1) # 288*288
    c4 = Conv2D(filters=128, kernel_size=(3,3), activation='relu', padding='same')(c3) # 288*288
    mp2 = MaxPool2D(pool_size=(2,2))(c4) # 144*144
    c5 = Conv2D(filters=256, kernel_size=(3,3), activation='relu', padding='same')(mp2) # 144*144
    c6 = Conv2D(filters=256, kernel_size=(3,3), activation='relu', padding='same')(c5) # 144*144
    mp3 = MaxPool2D(pool_size=(2,2))(c6) # 72*72
    c7 = Conv2D(filters=512, kernel_size=(3,3), activation='relu', padding='same')(mp3) # 72*72
    c8 = Conv2D(filters=512, kernel_size=(3,3), activation='relu', padding='same')(c7) # 72*72
    mp4 = MaxPool2D(pool_size=(2,2))(c8) # 36*36
    dr1 = Dropout(rate=0.3)(mp4)
    c9 = Conv2D(filters=1024, kernel_size=(3,3), activation='relu', padding='same')(dr1) # 36*36
    c10 = Conv2D(filters=1024, kernel_size=(3,3), activation='relu', padding='same')(c9) # 36*36

    #upsampling followed by a 2x2 convolution
#     up1 = UpSampling2D(size=(2,2))(c10) # 56*56
    # up convolve
    up1 = Conv2DTranspose(512, (2,2), strides=(2,2), padding='valid')(c10)    # 72*72 concatenate c8
    merge1 = concatenate([c8, up1]) # 72*72
    c11 = Conv2D(filters=512, kernel_size=(3,3), activation='relu', padding='same')(merge1) # 72*72
    c12 = Conv2D(filters=512, kernel_size=(3,3), activation='relu', padding='same')(c11) # 72*72
#     up2 = UpSampling2D(size=(2,2))(c12) # 104*104
    up2 = Conv2DTranspose(256, (2,2), strides=(2,2), padding='valid')(c12) # 144*144

    # concatenate c6
    merge2 = concatenate([c6, up2]) # 144*144
    c13 = Conv2D(filters=256, kernel_size=(3,3), activation='relu', padding='same')(merge2) # 144*144
    c14 = Conv2D(filters=256, kernel_size=(3,3), activation='relu', padding='same')(c13) # 144*144
    up3 = Conv2DTranspose(128, (2,2), strides=(2,2), padding='valid')(c14) # 288*288
#     # concatenate c4
    merge3 = concatenate([c4, up3])
    c15 = Conv2D(filters=128, kernel_size=(3,3), activation='relu', padding='same')(merge3) # 288*288
    c16 = Conv2D(filters=128, kernel_size=(3,3), activation='relu', padding='same')(c15) # 288*288
    up4 = Conv2DTranspose(64, (2,2), strides=(2,2), padding='valid')(c16) # 576*576
#     # conctenate c2
    merge4 = concatenate([c2, up4]) # 576*576
    c17 = Conv2D(filters=64, kernel_size=(3,3), activation='relu', padding='same')(merge4) # 576*576
    c18 = Conv2D(filters=64, kernel_size=(3,3), activation='relu', padding='same')(c17) # 576*576
    # filters here need to be the number of classes
    c19 = Conv2D(filters=1, kernel_size=(1,1), padding='same', activation='sigmoid')(c18) # 576*576

    return c19

#Initialize the model with the input shape
input_img = Input(shape = (432, 288, 3))
model = Model(input_img, unet(input_img))
I applied this model to the Carvana Image Masking Challenge. The images in the training set were scaled down to 432x288 to save time on training, no data augmentation technique was applied and the algorithm still performed pretty well on the test set:
 Results of the U-Net algorithm trained on scaled down images from Carvana Image Masking Challenge.
I am sure you can improve this result further by not downscaling as much as I did and trying some image augmentation.
References
- Olaf Ronneberger, Philipp Fischer, Thomas Brox: U-Net: Convolutional Networks for Biomedical Image Segmentation, 2015; https://arxiv.org/abs/1505.04597.
Comments