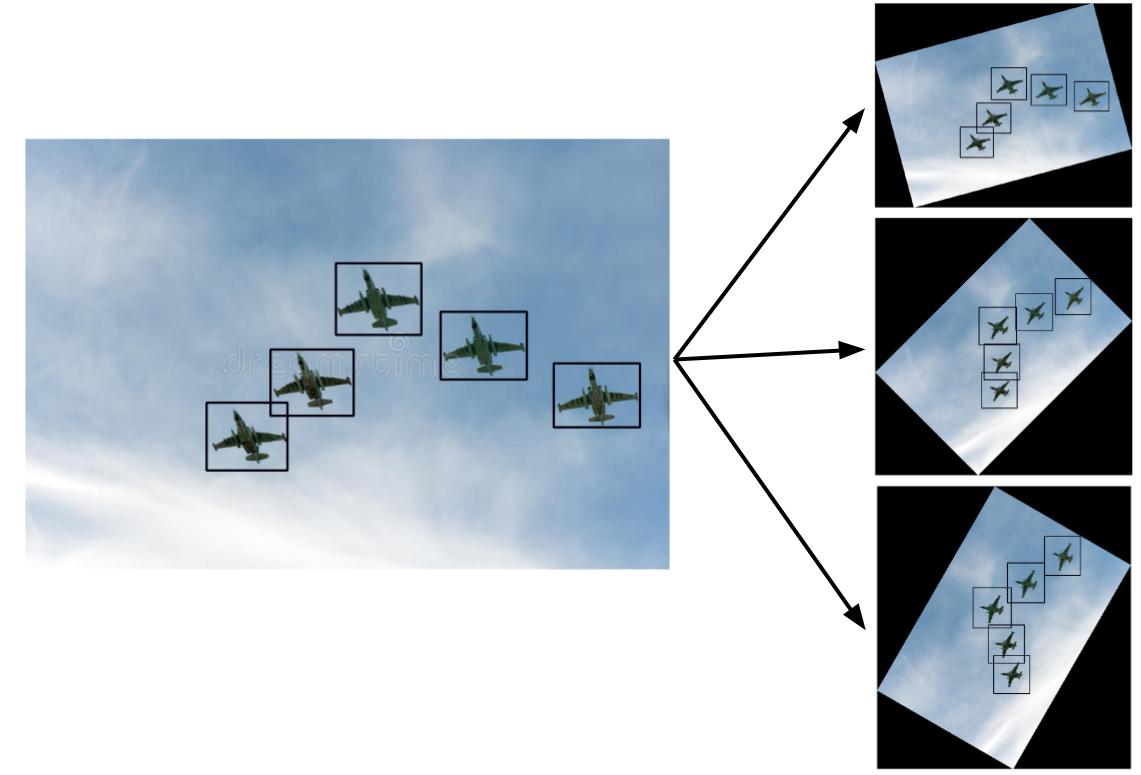
 Rotate the image along with the bounding boxes.
Image augmentation is a common technique in computer vision to increase the diversity of images present in a data set. One of the main challenges in computer vision is tagging, you only want to tag the original images and not the augmented images.
Recently while working on an image detection problem I wrote some code to rotate YOLO mark labels along with the images.
YOLO mark is a GUI for drawing bounding boxes of objects in images for YOLOv3 and YOLOv2 training. I can use Yolo mark to draw bounding boxes around the planes:
 Airplanes
In this tutorial I will cover the method to rotate the image and the bounding boxes generated using the Yolo_mark tool.
How Does Yolo_mark Format Work?
If we draw the following bounding box using Yolo_mark,
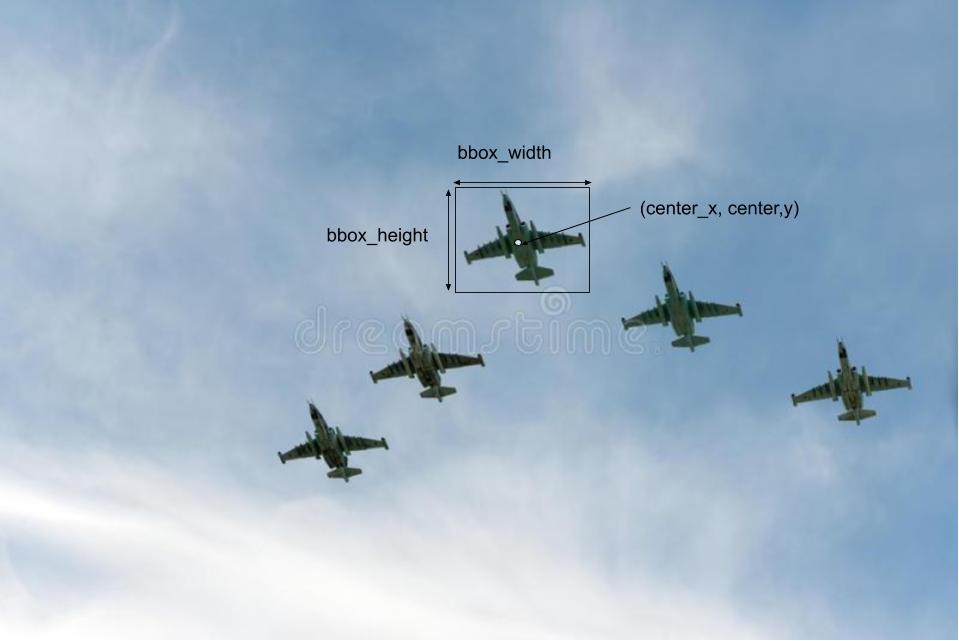
then a new text file will automatically be created with the following line:
\[\begin{align} \text{image label}, \text{center_x}/W, \text{center_y}/H, \text{bbox_width}/W, \text{bbox_height}/H \end{align}\]where \(W\) is the image width and \(H\) is the image height. This text file will have the same name as the image but with ‘.txt’ extension.
How to Rotate the Yolo_mark Format Bounding Box?
To rotate a point \((x,y)\) by \(\theta\), we need to multiply it by the rotation matrix.
\[\begin{align} \begin{pmatrix} \text{cos } \theta & -\text{sin } \theta \\ \text{sin } \theta & \text{cos } \theta \end{pmatrix} \end{align}\]A point \((x,y)\) will be rotated counterclockwise by angle \(\theta\). when multiplied by the rotation matrix.
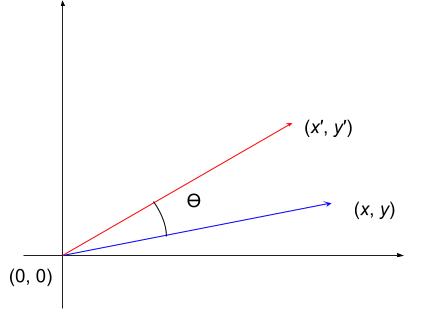
To obtain the new position, simply do
\[\begin{align} \begin{pmatrix} \text{cos } \theta & -\text{sin } \theta \\ \text{sin } \theta & \text{cos } \theta \end{pmatrix}* \begin{pmatrix} x \\ y \end{pmatrix} = \begin{pmatrix} x' \\ y' \end{pmatrix} \end{align}\]Once we have rotated all four corners of the bounding box this way, we need to find the 2 farthest rotated points along the the x-axis (this will correspond to the new width of the new bounding box) and the y-axis (this will correspond to the new height of the bounding box).
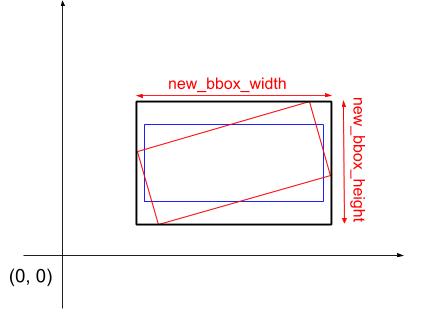 The old bounding box is in blue, the new rotated bounding box is in red. The new
bounding box whose dimensions we need for YOLO is shown in black.
The old bounding box is in blue, the new rotated bounding box is in red. The new
bounding box whose dimensions we need for YOLO is shown in black.
We need to recalculate the height and width of the rotatd box this way because YOLO only takes in bounding boxes parallel to the x-y axis.
Python Implementation
To start off lets createe an yoloRotateClass and initialize it with the name of the image, its extension and the angle you want to rotate the image by
class yoloRotatebbox:
    def __init__(self, filename, image_ext, angle):
        assert os.path.isfile(filename + image_ext)
        assert os.path.isfile(filename + '.txt')

        self.filename = filename
        self.image_ext = image_ext
        self.angle = angle

        # Read image using cv2
        self.image = cv2.imread(self.filename + self.image_ext, 1)

        # create a 2D-rotation matrix
        rotation_angle = self.angle * np.pi / 180
        self.rot_matrix = np.array(
            [[np.cos(rotation_angle), -np.sin(rotation_angle)], [np.sin(rotation_angle), np.cos(rotation_angle)]])
Rotating the image easy using cv2.
    def rotate_image(self):
        """
        Rotates an image (angle in degrees) and expands image to avoid cropping
        """
        height, width = self.image.shape[:2]  # image shape has 3 dimensions
        image_center = (width / 2,
                        height / 2)  # getRotationMatrix2D needs coordinates in reverse order (width, height) compared to shape

        rotation_mat = cv2.getRotationMatrix2D(image_center, self.angle, 1.)

        # rotation calculates the cos and sin, taking absolutes of those.
        abs_cos = abs(rotation_mat[0, 0])
        abs_sin = abs(rotation_mat[0, 1])

        # find the new width and height bounds
        bound_w = int(height * abs_sin + width * abs_cos)
        bound_h = int(height * abs_cos + width * abs_sin)

        # subtract old image center (bringing image back to origin) and adding the new image center coordinates
        rotation_mat[0, 2] += bound_w / 2 - image_center[0]
        rotation_mat[1, 2] += bound_h / 2 - image_center[1]

        # rotate image with the new bounds and translated rotation matrix
        rotated_mat = cv2.warpAffine(self.image, rotation_mat, (bound_w, bound_h))
        return rotated_mat
Once we have the image name and the rotated image dimension, we can read in the .txt file that has the bounding box information from Yolo_mark and rotate the bounding the box.
    def rotateYolobbox(self):

        new_height, new_width = self.rotate_image().shape[:2]

        f = open(self.filename + '.txt', 'r')

        f1 = f.readlines()

        new_bbox = []

        H, W = self.image.shape[:2]

        for x in f1:
            bbox = x.strip('\n').split(' ')
            if len(bbox) > 1:
                (center_x, center_y, bbox_width, bbox_height) = yoloFormattocv(float(bbox[1]), float(bbox[2]),
                                                                               float(bbox[3]), float(bbox[4]), H, W)

                # shift the origin to the center of the image.
                upper_left_corner_shift = (center_x - W / 2, -H / 2 + center_y)
                upper_right_corner_shift = (bbox_width - W / 2, -H / 2 + center_y)
                lower_left_corner_shift = (center_x - W / 2, -H / 2 + bbox_height)
                lower_right_corner_shift = (bbox_width - W / 2, -H / 2 + bbox_height)

                new_lower_right_corner = [-1, -1]
                new_upper_left_corner = []

                for i in (upper_left_corner_shift, upper_right_corner_shift, lower_left_corner_shift,
                          lower_right_corner_shift):
                    new_coords = np.matmul(self.rot_matrix, np.array((i[0], -i[1])))
                    x_prime, y_prime = new_width / 2 + new_coords[0], new_height / 2 - new_coords[1]
                    if new_lower_right_corner[0] < x_prime:
                        new_lower_right_corner[0] = x_prime
                    if new_lower_right_corner[1] < y_prime:
                        new_lower_right_corner[1] = y_prime

                    if len(new_upper_left_corner) > 0:
                        if new_upper_left_corner[0] > x_prime:
                            new_upper_left_corner[0] = x_prime
                        if new_upper_left_corner[1] > y_prime:
                            new_upper_left_corner[1] = y_prime
                    else:
                        new_upper_left_corner.append(x_prime)
                        new_upper_left_corner.append(y_prime)
                #             print(x_prime, y_prime)

                new_bbox.append([bbox[0], new_upper_left_corner[0], new_upper_left_corner[1],
                                 new_lower_right_corner[0], new_lower_right_corner[1]])

        return new_bbox
We can use this code to greatly increase the number and diversity of images to train our computer vision model. In addition, you can also add random noise to images before rotating, you can go crazy.
See the full code here.
Comments